Some organizations such as banks, insurance or financial institutions, have strict regulations in terms of data governance and compliance.
The definition of compliance data, accordingly with Wikipedia, is the following:
Compliance data is defined as all data belonging or pertaining to enterprise or included in the law, which can be used for the purpose of implementing or validating compliance. It is the set of all data that is relevant to a governance officer or to a court of law for the purposes of validating consistency, completeness, or compliance.
In other words, compliance means retaining records of conversations, for legal entities need to access and review those communications for an audit or litigation.
Anything used by the employee to communicate during a day to day business activity, is subject to this regulation: chat, emails, voicemail and social media communication, etc..
A few months ago, Microsoft introduced the Compliance and Governance admin portal in O365 to address this matter.
Since then the investments in security and compliance were huge and new features are being released atvery fast pace.
With this post, I’d like to show you how to enable retention for Skype for Business chat conversation.
Policy Creation
First step is to create a retention policy for the Skype for Business conversation from the Security and Compliance portal, Data Governance, Retention and Create.

You need to name the policy and add a description.

In the Settings tab, you can specify the retention period, what to do after the retention period is reached.
You can just simply use this feature to delete items older than a specific date.
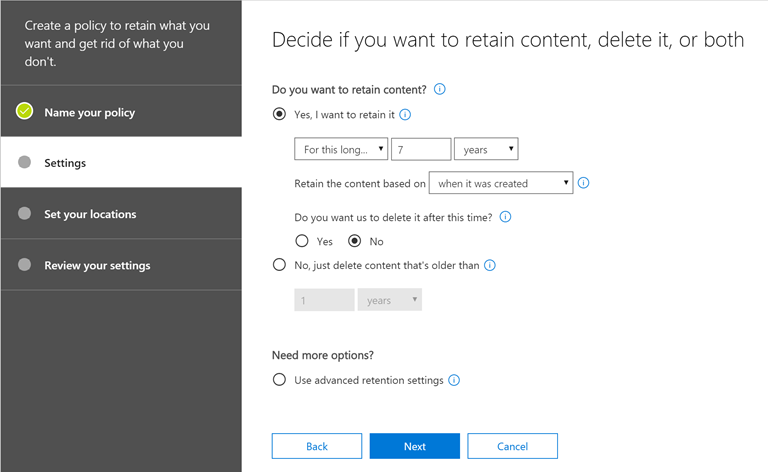
Additionally, you can create an advanced policy based on specific words or sensitive information.

Microsoft provides some templates for sensitive information for Financial, Medical and Privacy, but you can also create a custom one.
If you configure this Advanced Settings, only the items that satisfy the requirements will be retained.

After you defined your retention policy (7 years retention in my case), you need to specify for which product you want to enable it.
The same rule can be applied to all Microsoft products, but for the post´s purpose I only select Skype for Business.
For Skype for Business you now need to select the users you want to apply this policy to.

In my case I selected all the users in the organization

!Important:
If you enable a new user for Skype for Business Online, you also need to add it to the retention policy manually. It won’t be executed automatically.
This is important for operations team that must add this task in the user enablement activity.
You can also automate creating PowerShell scripts. Cmdlets list is available here
The last configuration is the Preservation Lock. If you enable it, no one (not even Microsoft support) will be able to delete the retention policy.
Use this setting carefully.

Last step is to validate the policy you just created. Remember that it might take up to 1 day to be applied.

Search Items
To create eDiscovery cases or search items, you need to have the right permissions.
Out of the box O365 comes with predefined groups with different permission levels, but you can also create your own.
For this example, I add my user as Compliance Administrator and eDiscovery Manager (at the moment there’s no possibility to add security groups from the O365 Compliance and Security portal).

After you grant the right permissions to the user in charge of compliance tasks, they can create a search query or eDiscovery case.
In this example, I created a Content Search from the Search & Investigation tab.
I gave a name to the Content Search and I used a custom filter to search only on Stefano Ceruti’s mailbox.
I don’t search in any SharePoint or OneDrive site as you can notice in the settings below.

The second setting you can configure is a filter. You can filter by keywords or specific conditions.

Since I’m only interested to IM conversation, I created a filter for this message type (more information about custom conditions are available here).

After you save the Content Search, it will appear in the list.

On the right pane, you have some statistics about the search, the possibility to re-run the search, to export and see the preview.
If you click to preview you will get a similar export.

As you can notice I only have the IM exchanged by the user affected to the compliance search.
The same procedure can be used for SharePoint or OneDrive files and emails.
What’s the difference between eDiscovery and Retention?
The concept behind eDiscovery and Retention Policies is quite similar but eDiscovery has priority compare to retention.
For example, if you have a retention policy of 1 year with an item deletion configured after the retention period but an eDiscovery case is created for an compliance investigation, for the user interested by this case the items won’t deleted since the eDiscovery case has been resolved no matter which is the retention policies configured for that user/tenant.
User Compliance setting
Skype for Business online also gives you the possibility to disable all the feature that cannot be controlled by retention like file transfer, OneNote sharing and PowerPoint annotations. You can control this feature directly from the Skype for Business admin portal in the Users pane.
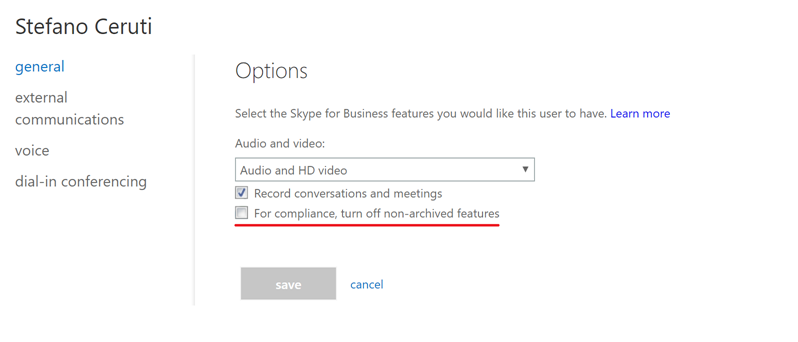
What happens behind the scenes is that the user gets a different Conferencing policy associated.
| Get-CsOnlineUser stceruti | fl Confer* ConferencingPolicy : BposSAllModality |
Get-CsOnlineUser stceruti | fl Confer* ConferencingPolicy : BposSAllModalityNoFT |
If you run a Get-CsConferencingPolicy you can see the difference between the two policies:
| DisablePowerPointAnnotations : Fasle AllowSharedNotes : True EnableFileTransfer : True EnableP2PFileTransfer : True |
DisablePowerPointAnnotations : True AllowSharedNotes : False EnableFileTransfer : False EnableP2PFileTransfer : False |
